Comms App – Print Client User Guide
These Icons allow the user to switch between the print configuration screen, pending, failed mail, and archive.
This icon will open the media library and is only visible if the user has the media library enabled.
The bottom icon logs out of the currently signed in user.

Selecting an item will show a preview of the letter.
The blue-bordered area is the area imail scrapes for the address. This should contain only the address, as text in this area is visible through the window on the envelope once enclosed.
Item Preview
When one document is selected, it will be visible in the preview panel. The first page will be show, and the viewer can navigate through the pages, and zoom in and out to examine the item using the controls above the preview.

The black-bordered area is the area which it is possible to see through the window on the envelope, if the letter slides around in the envelope. Text in this area will not be included in the address and will print normally, but as it may be visible it should not contain any confidential information.
The blue-bordered area is the area imail scrapes for the address. This should contain only the address, as text in this area is visible through the window on the envelope once enclosed.

Where “Multiple Documents” is selected, the user must chose between splitting by a set number of sides, or a keyword on the documents.
If the user attempts to print while “Multiple Documents” is selected, they will be prompted to either finish splitting the document, or amend the selection to single.
Splitting by a fixed number of sides is the simplest way to split, if all the letters in the document have two sides, splitting by every two sides will correctly separate the documents regardless of content.

If the document contains letters with different numbers of sides, we can select a keyword that appears on only the first or last page of each document.
The following page contains more detail on this.

Splitting by keyword
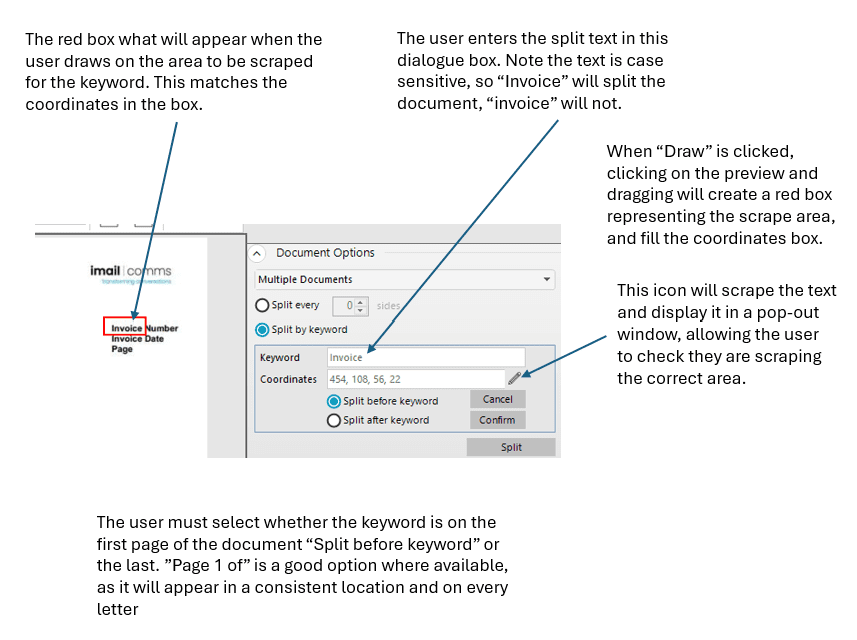
The keyword split requires the user to choose text that appears on only the first or last page, in a specific position as the indicator that a new letter is starting.


Once the user clicks Confirm, the red box is no longer displayed, and clicking on the preview will no longer amend the coordinates and the user can click split to move onto the next step.
Applying Print Options
Print options must be set for each letter before printing, when multiple letters are selected in the outbox the print settings will be applied to all of them.

1. The delivery option is the service, with options for standard, premium, or International.
2. The colour setting is a choice between colour printing and monochrome (black and white) print. If a document contains colour and is submitted mono it will be converted to monochrome prior to printing.
3. Plexity is a choice between either Duplex (print on the front and reverse of each sheet) or Simplex (print on the front only)
Applying Letterheads
Letterheads can, optionally, be applied to documents from the print client.
If a letterhead is already present it is not necessary to apply one, but if one is selected in the dropdown and Add clicked, it will be shown on the letter preview.


Applying Attachments
If attachments are present in the user’s media library, they will be displayed in the attachments menu. Many users will not have content here, but where attachments are present the desired attachments can be selected and “update” clicked.
Once an attachment/attachments are applied in the print client, the Side count at the top of the preview will be updated, the attachment will be available in the preview to scroll through and view, and when a single item with an attachment(s) applied is selected, the attachments will be checked in this list.
If the attachment is un-checked and Update is clicked, the attachment will be removed, and this will be reflected in the page count and preview.


Sending or Cancelling Documents
Once all the desired settings have been applied to items in the print queue, the documents can be selected and the buttons in the bottom right can be used to send or cancel the documents as required. The count on the buttons will reflect how many items are selected for printing.


